
[ad_1]

Including bar rail molding, also called Chicago bar rail or wood bar armrests, lends a cultured, skilled end to any DIY dwelling or industrial bar venture. Primarily, it offers a snug perimeter for visitors, whether or not seated or standing, and creates a protecting lip to include glassware and spills on the bar prime, protecting the ground clear and secure.
Selecting the wooden for bar arm rests
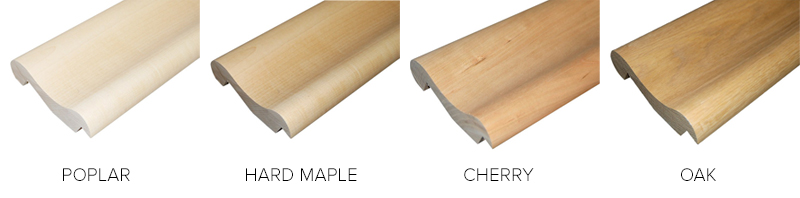
Our wood bar rail molding is accessible in 4 sorts of wooden: cherry, arduous maple, pink oak, and poplar. Every possibility presents a distinct shade, density, and grain sample.
- Poplar: Creamy white with occasional darkish streaks, poplar is straightforward to chop, sand, and paint. Nevertheless, it’s softer and extra liable to dings and scratches than different hardwoods.
- Laborious maple: Off-white with yellow-brown and pink tones, arduous maple has a detailed grain and is very proof against dents and put on.
- Cherry: Identified for its wealthy, reddish-brown shade and easy, shut grain, cherry resists humidity and usually doesn’t warp. It darkens with solar publicity and stains superbly.
- Purple oak: Mild brown with a slight pink tint and an open grain, pink oak is exceptionally sturdy and well-suited for high-traffic areas. Its energy and nail-holding capability make it a well-liked selection for furnishings and bars.
All of our wood arm rests come unstained with the intention to match the arm relaxation to your bar or select a complementary stain or shade if you’re seeking to create distinction. Make sure to stain, varnish, or paint your arm rail and let each bit dry absolutely earlier than set up.
Selecting between mitered and rounded corners
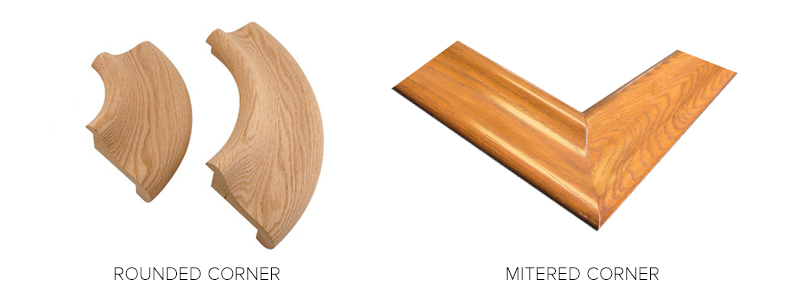
When planning any armrest venture, think about deal with the bar’s corners:
- Mitered Corners: Essentially the most economical possibility is to make mitered corners utilizing two straight molding items reduce at an angle.
- Rounded Corners: Rounded or radiused corners supply a custom-made, polished look, decreasing sharp edges and minimizing the danger of accidents. Crafted from a single piece of hardwood, radius corners are a premium possibility, with pricing various by wooden kind and radius dimension (1.5″, 3″, or 6″).
Set up ideas for bar rail molding
1. Give your self sufficient size
In case your bar is 12 ft lengthy, don’t simply purchase 12 ft of molding. Purchase some extra size to present your self room for cuts and errors.
2. Measure, measure, after which measure once more
Triple-check your numbers earlier than you begin reducing. Belief us on this one.
How-to set up wood bar rail molding
You acquired your arm relaxation order and are prepared to put in. Right here’s the way you go about it.
Instruments wanted
- Electrical drill
- Screws
- Miter noticed (chop noticed)
- Clamps (for securing molding whereas drilling)
- Wooden glue
- Measuring tape
1. Put together the bar prime
Our wood arm rails relaxation at an angle over two items of stepped wooden. The highest piece of wooden is your completed bar prime; the underside piece of wooden juts out additional and offers structural help.
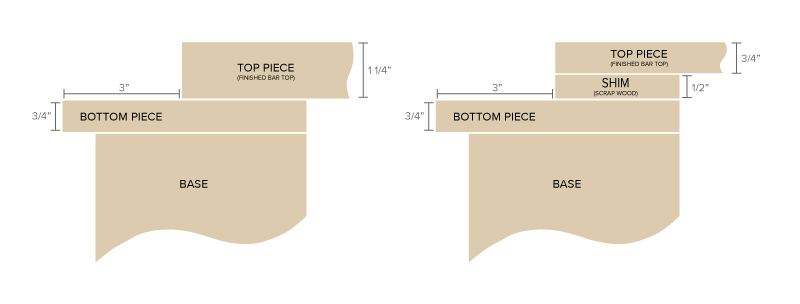 As you’ll be able to see within the determine above, the underside piece of wooden ought to measure ¾” thick and lengthen three inches previous your completed bar prime. Your completed bar prime ought to measure 1 ¼” thick. In case your bar prime is thinner, shim it with a bit of unfinished scrap wooden (you gained’t see the shim when the set up is full). Use glue and pneumatic staples to adjoin the structural wooden, completed bar prime, and any shim you may use.
2. Lower molding to size
Our wood arm rails are available in 2′, 4′, and eight’ lengths. We advocate shopping for the following largest rail size for every straight run of your bar and reducing it all the way down to dimension. It will scale back the variety of seams in your completed product. In case you have a run longer than 8′, you have to seam two items of rail collectively.
We advocate utilizing a shawl joint if you’re seaming collectively two lengths of arm relaxation in a straight run. This requires reducing a beveled edge in order that the 2 items match collectively at an angle, making for a tighter seam.
In case your bar has a nook or corners, and also you determined to go the miter joint route, reduce the ends of your adjoining molding at a 45-degree angle. Word that arm relaxation has a large profile, so reducing it to a exact 45-degree angle is troublesome. If you’re new to woodworking, chances are you’ll need to search the assistance of somebody extra skilled. You may also discover this video on reducing exact miter joints useful.
In case your bar has a nook or corners and also you opted for radius corners, you might reduce a beveled edge to kind your seam. Nevertheless, reducing a radius nook on a miter noticed might be notably troublesome. As an alternative, we advocate a easy butt joint. It’s possible you’ll select to chop clear ends, however no particular cuts are crucial.
3. Dry match all items
You need to ensure every thing matches collectively as meant earlier than you begin drilling and gluing. Don’t skip this step.
4. Pre-drill holes

Picket arm rests are fixed in common intervals from the underside (see above determine for screw placement). To safe the molding, pre-drill holes within the underside, taking care to not drill via the wooden. Use clamps to carry the molding in place.
5. Assemble and end arm relaxation
As soon as your holes are drilled, you’ll be able to start attaching your molding. With glue on the seam the place the arm rail meets the bar prime, align and screw the molding into place. Wipe away extra glue for a clear end. In case your arm rail doesn’t finish at a wall, connect bar rail molding finish caps for a completed look. These ought to be glued on to keep away from seen nails.
As soon as put in, your bar will boast knowledgeable, completed look with added consolation in your visitors. Benefit from the outcomes!
[ad_2]